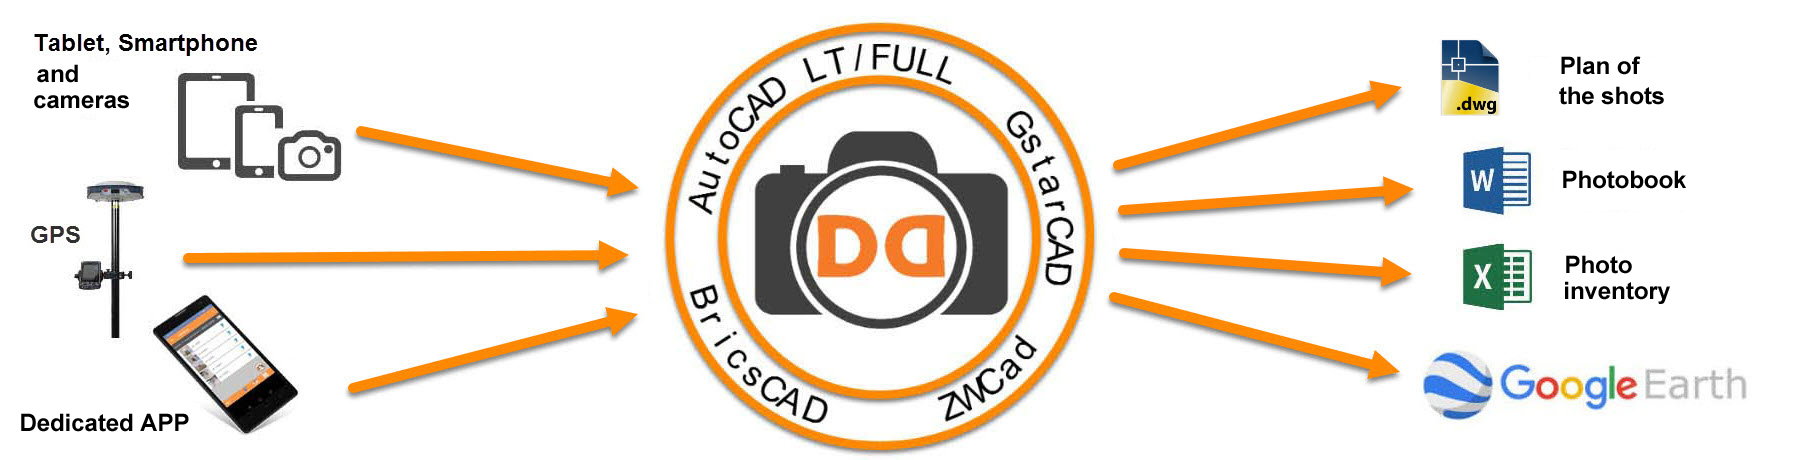
caDDrag
Manage your work photos ...

schema EN

sfondo sottile

How does it work?

It is very simple and intuitive!

The caDDrag Suite includes 3 products: caDDrag, PhotoDrag and Shared:

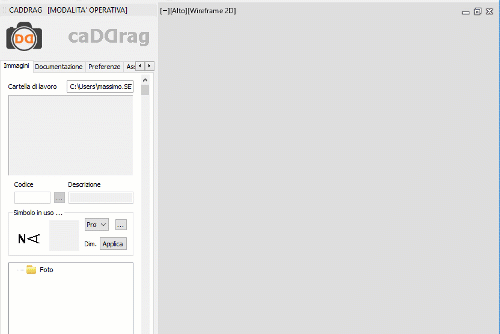
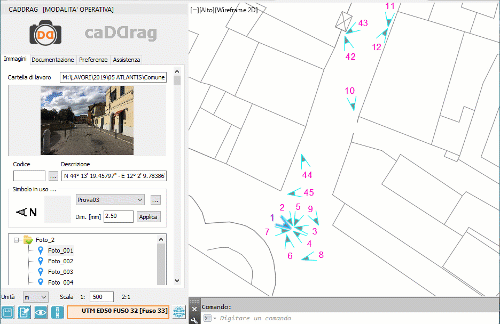
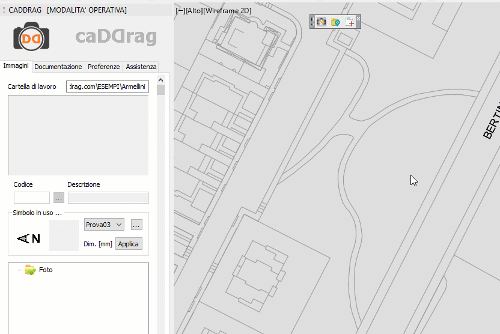
  • caDDrag is a CAD application to create the plants of the shots, etc.
  • PhotoDrag is an Android APP to better manage work photos
  • Shared is a WebApp to share stored information in the work group

The products are complementary and the complete Suite offers maximum functionality, but in order to best meet your needs, you can not only choose which of the 3 products to buy, but even choose between 3 levels of functionality. This mode allows you to "calibrate" the purchase of the software, thus maximizing your investment.


Depending on the version you purchased, you will have more or less functionality available.

Here is what you can do:

If you have the Desktop BASE version ...

You will have all the features to organize, store and print your photos, even taken by a camera; but you will not be able to geolocate your photos or make graphic notes by drawing on them.

02 - Take photos

Take photos

You can use any acquisition device (camera, smartphone, tablet)


But if you use the dedicated APP, then you will optimize your work by structuring the photos inside the Works folders

IT IS NOT IMPORTANT that you set an adequate resolution to optimize the size of the photos:
caDDrag itself will resize the images to an appropriate resolution both for the file and for any publication on the web


Take your photos without forgetting to note the position of the photographic snap point and then, once back in the office, place the points of view in the plan


03 - Download the photos

Download the photos

Connect your device to your computer and download the photos into a folder.

But if you use the dedicated APP, then you can save the photos of your works automatically, using the appropriately configured Wifi network.  

04 - Drag your photos

Drag your photos

Open your CAD and at the same time also open the folder where you downloaded the photos into.

Drag the photos from the folder one at a time to the graphic environment.

Indicate the point of view and insert any caption (optional).

You can also enter a "code" that can identify the belonging of the photo to a given category,
caDDrag will take care of the rest!

You will find the photos, already renamed, listed in the control panel tree.
Selecting the name of the photo, you will see the preview in the designated area on the control panel.

05 - Organize your photos

Organize your photos

If you wish, you can create folders to split the photos and drag them into those new folders.

For example: if you take pictures of the interior of a multi-storey building, you can create a structure of folders, corresponding to the floors, which will contain the corresponding photos.

But if you use the dedicated APP, then you will have already organized your photos into folders and so you will be able to automatically import the structure and the photos.


06 - Make the photobook

Make the photobook

Create the photo book? It's a piece of cake!


Select the paper format (A4 or A3) and the layout you prefer among those proposed.
caDDrag will take care of the rest!


The photos will be automatically "lightened" to reduce the size of the final file, ensuring good print quality.
A layout with the photos will be created according to the chosen model and it will show the name and any caption.
The generation of the .rtf file compatible with Word and Open Office is completely automatic.
You can edit the file to insert, for example, your personalized cover page or to make any changes.


07 - if you have the Desktop Plus version ...

if you have the Desktop Plus version ...

then you can use all the features of the BASIC version also on your Windows Tablet.

In fact, the PLUS version includes the tablet camera control directly from the CAD environment that you previously installed on the tablet.

In this way, you will be able to work directly on the building plan, you will be able to take photos and insert the symbol exactly in the point you will specify on the screen.

This will simplify and tremendously speed up your work because you will not have to take notes on paper to write down the various points of view.

Once back in the office, in a few minutes you will be able to create the photographic file.

And with the dedicated APP, you can upload on your smartphone a PDF on which to place the photografic snap points (survey base / building plan), draw a map to be used as the basis of your survey, or you can take a photo on which to write down comments and measures.

Also this mode will allow you to optimize the survey work which will then be completed in the office by producing the photobook file


08 - if you have the Desktop Pro version ...

if you have the Desktop Pro version ...

then you can also manage geotagged photos, or photos containing geographic coordinates (Latitude and Longitude)

These photos can be automatically inserted into the drawing and also be published on Google Earth.

With the dedicated APP, you can easily classify and organize your photos

What you need to do is:

Once the photos are uploaded into a folder on your disk, open caDDrag, position the cursor in the tree structure area and click the right mouse button; from the dropdown menu select "Upload geotagged photos"

Select the folder where you downloaded the photos and click OK
All photos will be inserted automatically


09 - coordinate traslation

By default caDDrag automatically converts the coordinates from Geografiche to Piane UTM WGS84 - Belonging zone.

If you have technical maps or georeferenced surveys on which to insert the views of your photos, you will have to select the type of coordinate system to be used for the conversion.

Italian maps are linked to different geographical systems and therefore you must select the one corresponding to the one you have.

Conversions are possible from:

  • GEOGRAPHICAL (WGS84) with FLATS Universal Transverse Mercator (UTM) System - Time zone of belonging or overlapping (32/33)
  • GEOGRAPHIC (WGS84) a PIANE UTM-ED50 (European Datum 1950) - Time zone of belonging or overlapping (32/33)
  • GEOGRAPHIC (WGS84) in Gauss-Boaga - Time zone of belonging or overlapping (West / East)

In addition, it is also possible to import only the geographical coordinates (without the photo) from a text file (csv) and general the kml file for the publication of the survey and / or the project on Google Earth.

Compatible with                                           Commercial policies                             Versions

Platform CAD:

  • AutoCAD LT 2011-19sp1
  • AutoCAD FULL 2010-20
  • GstarCAD 2017-20
  • ZWCad 2020

Operating system:

  • Windows 7 32/64bit
  • Windows 10 32/64bit